In the realm of 3D modeling, UV mapping stands as a crucial technique that breathes life into digital creations. It’s the art of transforming 3D models into 2D patterns, enabling the application of textures that add intricate details and realism.
Mastering UV mapping unlocks a world of possibilities, from captivating characters to breathtaking environments. In this comprehensive guide, we present CG Society’s 6 essential tips to ensure a seamless UV mapping workflow, empowering you to elevate your 3D artistry.
Embark on a journey through the intricacies of UV mapping, where we’ll delve into key concepts, industry applications, and common pitfalls. Discover the secrets of preparing 3D models, selecting the optimal UV mapping method, and creating efficient UV shells and islands.
We’ll guide you through the unwrapping process, packing and optimizing UV layouts, and applying textures with precision. By the end of this exploration, you’ll possess the knowledge and skills to tackle any UV mapping challenge with confidence, propelling your 3D creations to new heights of realism and artistry.
Introduction to UV Mapping Workflow
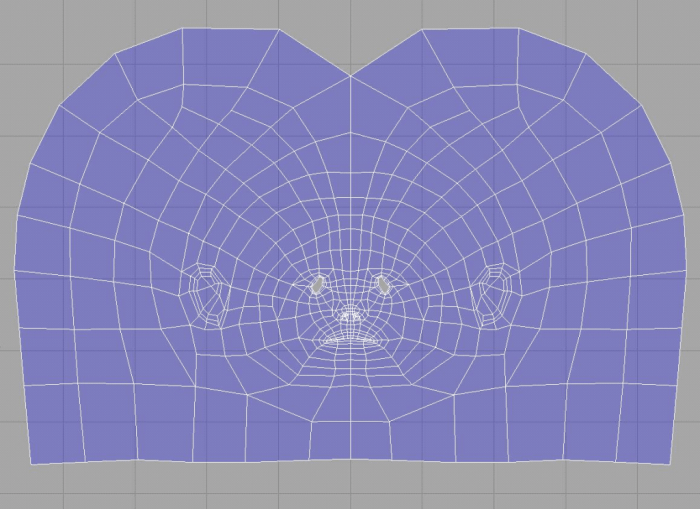
UV mapping is a crucial process in 3D modeling that involves the unwrapping of a 3D model’s surface into a 2D plane. This process allows for the application of textures and materials to the model’s surface, bringing it to life and enhancing its realism.
UV mapping plays a significant role in various industries and applications, including:
- Game Development: UV mapping is essential for creating detailed and realistic textures for 3D models in video games, allowing artists to apply intricate details and textures to characters, objects, and environments.
- Film and Animation: UV mapping is used to create textures for 3D models in animated films and TV shows, enabling artists to bring characters and objects to life with intricate details and realistic textures.
- Architecture and Design: UV mapping is utilized to apply textures to 3D models of buildings, interiors, and products, allowing architects and designers to visualize and present their designs in a realistic manner.
Despite its importance, UV mapping can present challenges and pitfalls. Some common issues include:
- Distortion and Stretching: When unwrapping a 3D model’s surface onto a 2D plane, distortion and stretching can occur, resulting in distorted textures and unnatural-looking results.
- Overlapping UVs: When multiple parts of a 3D model overlap in the 2D UV space, it can lead to incorrect texture mapping and visual artifacts.
- Seams and Artifacts: Improper UV mapping can result in visible seams or artifacts on the model’s surface, breaking the illusion of realism and immersion.
Understanding UV Mapping Terminology
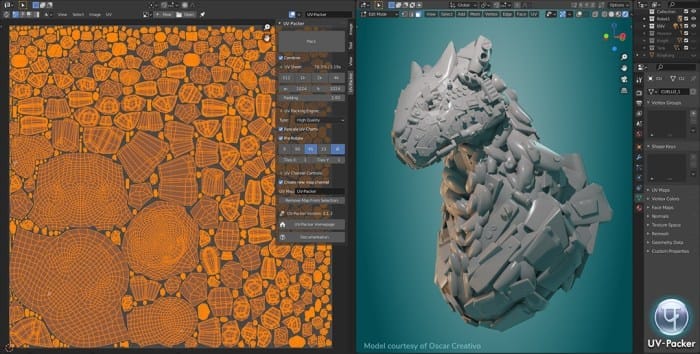
UV mapping is the process of applying a 2D texture to a 3D model, ensuring that the texture is properly aligned and scaled to the model’s surface. To understand UV mapping, it’s essential to familiarize yourself with some key terminology.
UV Shells
A UV shell is a connected group of UV islands that share the same UV space. UV shells are typically created by unwrapping the 3D model’s surface onto a 2D plane, ensuring that the texture is applied consistently across the model.
UV Islands
UV islands are individual, non-overlapping areas within a UV shell that represent a specific part of the 3D model’s surface. UV islands are typically created by cutting the UV shell along its seams, ensuring that the texture is applied correctly to each part of the model.
UV Seams
UV seams are the boundaries between UV islands. They are typically created by marking the edges of the 3D model’s surface where the texture should be split, ensuring that the texture is applied smoothly across the model.
UV Space
UV space is the 2D coordinate system used to represent the UV mapping of a 3D model. UV space is typically a square or rectangular area, with the U axis representing the horizontal direction and the V axis representing the vertical direction.
The texture is applied to the 3D model by mapping the UV coordinates of the texture to the UV coordinates of the model’s surface.
Visual representations and diagrams can be found online to further illustrate these concepts.
Preparing the 3D Model for UV Mapping
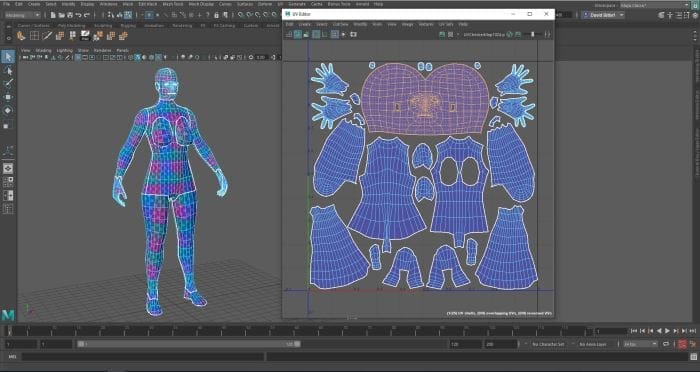
Before embarking on UV mapping, it’s essential to prepare your 3D model meticulously. This involves cleaning the geometry, optimizing the mesh, organizing and naming objects and components within the model, and establishing a systematic UV mapping workflow.
Cleaning the Geometry
Begin by inspecting the 3D model for any unnecessary or problematic geometry. Eliminate duplicate vertices, edges, and faces. Correct any flipped normals to ensure proper shading. Merge vertices that share the same position to reduce the overall vertex count. This process, known as “cleaning the geometry,” streamlines the UV mapping workflow and improves the overall quality of the final UV map.
Optimizing the Mesh
Next, optimize the mesh by reducing the number of polygons while preserving the overall shape and detail. This can be achieved through techniques like quadrangulation, which involves converting triangles into quads. Quads are generally preferred for UV mapping as they produce more uniform and predictable results.
Additionally, consider using a decimation algorithm to reduce the polygon count without compromising the model’s integrity.
Organizing and Naming Objects and Components
To facilitate efficient UV mapping, it’s crucial to organize and name objects and components within the 3D model clearly and consistently. Group related objects together and assign meaningful names that reflect their function or location. This organization simplifies the process of selecting and manipulating objects during UV mapping, reducing the risk of errors and ensuring a more streamlined workflow.
Creating a Clean and Efficient UV Mapping Workflow
Finally, establish a systematic UV mapping workflow that suits your specific project and software. Consider factors such as the desired level of detail, the texture resolution, and the intended use of the model. Develop a standardized approach to UV mapping that includes steps like unwrapping, aligning, scaling, and packing UV islands.
This structured workflow promotes consistency, efficiency, and accuracy in the UV mapping process.
Choosing the Right UV Mapping Method
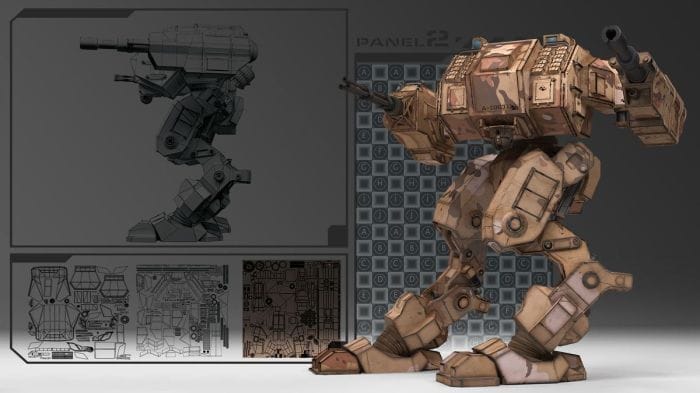
Selecting the appropriate UV mapping method is crucial for achieving optimal results in texturing and rendering 3D models. Different UV mapping methods offer unique advantages and disadvantages, making them suitable for specific types of models and applications.
Cylindrical UV Mapping
Cylindrical UV mapping is commonly used for cylindrical objects like bottles, pipes, and columns. It involves projecting the model’s surface onto a cylindrical surface, creating a continuous and distortion-free texture map. Cylindrical UV mapping is particularly useful when the model has a repetitive pattern or texture.
Planar UV Mapping
Planar UV mapping is suitable for flat surfaces like walls, floors, and planes. It involves projecting the model’s surface onto a flat plane, resulting in a simple and straightforward UV map. Planar UV mapping is often used for architectural visualization and game development.
Spherical UV Mapping
Spherical UV mapping is ideal for spherical objects like globes, balls, and planets. It involves projecting the model’s surface onto a spherical surface, ensuring minimal distortion and preserving the model’s shape. Spherical UV mapping is commonly used in creating textures for celestial bodies and spherical objects.
Cube Mapping
Cube mapping is a technique used for creating environment maps, which are used to simulate reflections and provide realistic lighting effects. It involves projecting the surrounding environment onto the six faces of a cube, creating a seamless and immersive experience.
Cube mapping is widely used in game development and virtual reality applications.
The choice of UV mapping method depends on various factors, including the model’s shape, the desired texture pattern, and the intended application. Consider the following aspects when selecting the appropriate UV mapping method:
- Model Shape: The shape of the model plays a significant role in determining the most suitable UV mapping method. For example, cylindrical UV mapping is ideal for cylindrical objects, while spherical UV mapping is best for spherical objects.
- Texture Pattern: The desired texture pattern also influences the choice of UV mapping method. For example, if the texture has a repetitive pattern, cylindrical or planar UV mapping may be appropriate. However, if the texture is complex and irregular, spherical or cube mapping may be more suitable.
- Intended Application: The intended application of the 3D model also affects the selection of the UV mapping method. For example, if the model is intended for game development, planar or cylindrical UV mapping may be preferred due to their efficiency and simplicity. On the other hand, if the model is intended for architectural visualization or rendering, spherical or cube mapping may be more appropriate to achieve realistic and detailed textures.
Creating UV Shells and Islands
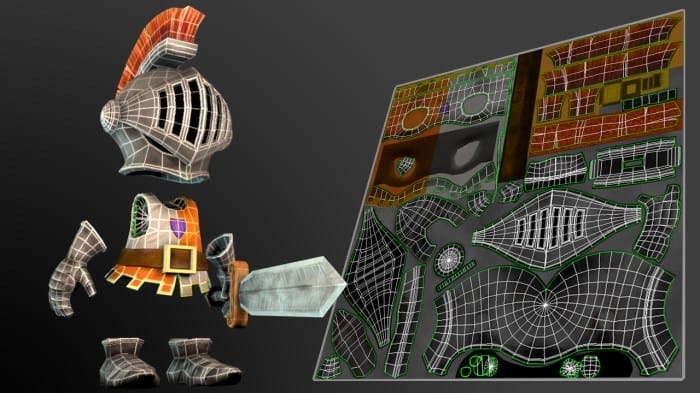
In the process of UV mapping, creating UV shells and islands involves selecting appropriate seams, cutting the model, and arranging the pieces onto the UV space. UV shells are contiguous sections of the model’s surface that are mapped onto the UV space without distortion.
UV islands are smaller sections of the model’s surface that are mapped onto the UV space separately from other shells.
Selecting Seams
The selection of seams is crucial in creating clean and efficient UV shells and islands. Seams are the edges along which the model is cut to create UV shells. Ideally, seams should be placed along natural boundaries in the model’s geometry, such as creases, edges, and corners.
This helps to minimize distortion and maintain the integrity of the texture.
Cutting the Model
Once the seams have been selected, the model is cut along these seams to create UV shells. This can be done manually or with the help of UV mapping software. When cutting the model, it is important to ensure that the UV shells are laid out efficiently on the UV space, minimizing wasted space and overlapping.
Arranging UV Shells and Islands
The UV shells and islands are then arranged onto the UV space. This involves positioning and scaling the shells to fit within the UV space and to minimize distortion. It is also important to consider the orientation of the shells in relation to each other, as this will affect the appearance of the texture on the model.
Tips for Creating Clean and Efficient UV Shells and Islands
*
-*Plan Ahead
Before starting the UV mapping process, take some time to plan out the seams and the layout of the UV shells. This will help you to create a clean and efficient UV map.
-
-*Use Natural Seams
Whenever possible, place seams along natural boundaries in the model’s geometry. This will help to minimize distortion and maintain the integrity of the texture.
-*Avoid Overlapping Shells
When arranging the UV shells on the UV space, avoid overlapping them. This can cause problems when applying the texture to the model.
-*Minimize Distortion
When positioning and scaling the UV shells, try to minimize distortion. This will help to ensure that the texture appears correctly on the model.
-*Consider the Texture Resolution
When creating the UV map, consider the resolution of the texture that will be applied to the model. This will help you to determine the level of detail that is needed in the UV map.
Unwrapping the UV Shells
Unwrapping UV shells is a crucial step in UV mapping, where the 3D model’s surface is flattened into a 2D plane.
This allows for the application of textures and materials onto the model in a consistent and seamless manner.
The process of unwrapping UV shells involves selecting and isolating specific parts of the 3D model, known as UV shells or islands, and then flattening them onto a 2D plane. This can be done using various software tools, each with its own unique set of features and techniques.
Common Software Tools for UV Unwrapping
- Blender: A free and open-source 3D modeling software that offers a range of UV unwrapping tools, including automatic unwrapping algorithms and manual editing options.
- Maya: A professional 3D modeling and animation software that provides advanced UV unwrapping capabilities, such as angle-based unwrapping and support for complex models.
- 3ds Max: Another industry-standard 3D modeling software with robust UV unwrapping tools, including options for cylindrical and spherical unwrapping.
- Substance Painter: A specialized texturing software that offers dedicated UV unwrapping tools designed for efficient texture painting and material application.
Steps for Unwrapping UV Shells
- Select the UV shells or islands that you want to unwrap. This can be done using various selection tools provided by the software, such as box selection, lasso selection, or vertex selection.
- Apply an appropriate UV unwrapping method. There are different unwrapping methods available, each with its own advantages and disadvantages. Common methods include planar mapping, cylindrical mapping, spherical mapping, and cube mapping.
- Adjust the UV shells’ position and orientation on the 2D plane. This can be done by dragging the shells around, rotating them, or scaling them. The goal is to arrange the shells in a way that minimizes distortion and optimizes texture space.
- Resolve any overlapping or intersecting UV shells. Overlapping shells can cause texture bleeding and artifacts. To resolve this, you can manually adjust the shells’ positions or use the software’s automatic shell packing algorithms.
Common Issues During Unwrapping
- Distorted UV Shells: Unwrapping certain complex shapes can result in distorted UV shells. To minimize distortion, try using different unwrapping methods or manually adjusting the shells’ positions.
- Overlapping UV Shells: Overlapping shells can occur when the model’s geometry is complex or when the unwrapping method is not suitable. Resolve overlaps by manually adjusting the shells’ positions or using automatic packing algorithms.
- Unresolved Seams: UV seams are the boundaries between UV shells. If the seams are not properly resolved, they can cause visible artifacts in the texture. To resolve seams, you can use the software’s seam stitching tools or manually adjust the shells’ positions.
Packing and Optimizing the UV Layout
Packing and optimizing the UV layout is a crucial step in UV mapping as it ensures efficient utilization of texture space and minimizes stretching, distortion, and overlapping of UV islands. By creating a compact and well-organized UV layout, you can achieve better texture quality and reduce the chances of visual artifacts in your 3D model.
Importance of Packing and Optimizing UV Layout
A well-packed UV layout allows you to use the texture space more efficiently, resulting in a smaller texture size and faster rendering times. Additionally, it minimizes the amount of wasted space between UV islands, which can lead to blurry or pixelated textures.
Tips for Creating a Compact and Efficient UV Layout
UV packing algorithms can automatically arrange the UV islands in a compact and efficient manner. There are various algorithms available, each with its own strengths and weaknesses. Experiment with different algorithms to find the one that works best for your specific model.
–
–
–
Techniques for Minimizing Stretching, Distortion, and Overlapping of UV Islands
–
- Use conformal mapping: Conformal mapping is a technique that preserves angles between surfaces when transferring them to the UV space. This can help minimize stretching and distortion, especially for curved surfaces.
- Use cylindrical or spherical mapping: Cylindrical and spherical mapping are two common UV mapping methods that can help minimize distortion on curved surfaces. Cylindrical mapping is suitable for objects with a cylindrical shape, while spherical mapping is suitable for objects with a spherical shape.
- Use UV pinning: UV pinning allows you to fix the position of specific UV islands in the UV space. This can be useful for preventing important features from being distorted or stretched.
- Use UV seams: UV seams are lines that define the boundaries between different UV shells. By placing UV seams along natural seams or edges in the model, you can help minimize stretching and distortion.
–
–
–
Applying Textures to the UV Map
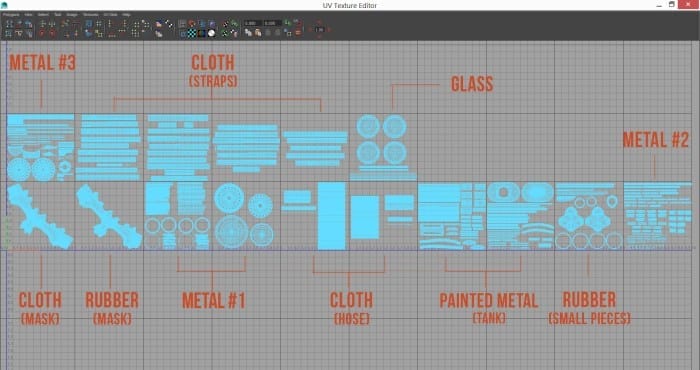
Applying textures to a UV map is crucial for adding detail and realism to 3D models. It involves transferring 2D textures onto the surface of the 3D model, creating a cohesive and visually appealing representation. This section delves into the process of texture application, addressing texture resolution, format selection, and common issues encountered during the process.
Selecting the Appropriate Texture Resolution and Format
The resolution of the texture directly impacts the quality of the final render. Higher-resolution textures provide finer details and sharper images, but they also require more memory and processing power. The format of the texture also plays a significant role, with common formats including JPEG, PNG, and TIFF.
Each format has its own advantages and disadvantages, such as compression level, color depth, and transparency support.
Applying Textures Using Different Software Tools
Various software tools offer different approaches to texture application. In general, the process involves selecting the desired texture file, positioning it correctly on the UV map, and adjusting its scale and rotation to match the model’s surface. Some software tools provide automated texture mapping features, while others require manual adjustments for precise alignment.
Common Issues Encountered During Texture Application and How to Resolve Them
Several common issues can arise during texture application, including texture stretching, tearing, and misalignment. Texture stretching occurs when the texture is stretched or compressed to fit a larger or smaller area on the UV map, resulting in distorted or blurry images.
Tearing occurs when the texture is not properly aligned with the UV shells, causing visible seams or gaps in the texture. Misalignment occurs when the texture is not positioned correctly on the UV map, resulting in the texture appearing in the wrong location on the model.
To resolve these issues, it is important to carefully position and scale the texture on the UV map, ensuring that it aligns properly with the model’s surface. Additionally, using high-resolution textures and selecting the appropriate texture format can help minimize stretching and tearing.
Troubleshooting Common UV Mapping Issues
UV mapping is a crucial step in the 3D modeling process, and encountering issues is common. These issues can range from stretching and distortion to overlapping and seams. By understanding the causes and solutions to these problems, you can ensure a clean and efficient UV mapping workflow.
Identifying Common UV Mapping Issues
Some of the most prevalent UV mapping issues include:
- Stretching and Distortion: This occurs when a UV shell is stretched or warped, resulting in distorted textures.
- Overlapping: When multiple UV shells overlap, it can lead to texture bleeding and artifacts.
- Seams: Visible seams between UV shells can disrupt the flow of textures.
Troubleshooting and Resolving UV Mapping Issues
To address these issues, follow these steps:
- Stretching and Distortion: Adjust the UV shell’s vertices to distribute the texture more evenly. Utilize relax and smooth tools to minimize distortion.
- Overlapping: Identify the overlapping UV shells and adjust their positions to eliminate the overlap. Ensure proper spacing between shells.
- Seams: Examine the UV layout for areas where seams are likely to occur. Adjust the UV shells’ positions or consider using different UV mapping techniques to minimize seams.
Preventing UV Mapping Issues
To prevent these issues from arising in the first place, consider the following:
- Proper UV Unwrapping: Unwrap UV shells carefully, paying attention to the flow of the texture and avoiding excessive stretching or distortion.
- Organize UV Shells: Arrange UV shells efficiently to minimize wasted space and overlapping.
- Use Appropriate UV Mapping Techniques: Select the most suitable UV mapping method for your model’s geometry. Consider techniques like cylindrical, spherical, or planar mapping.
Best Practices for UV Mapping
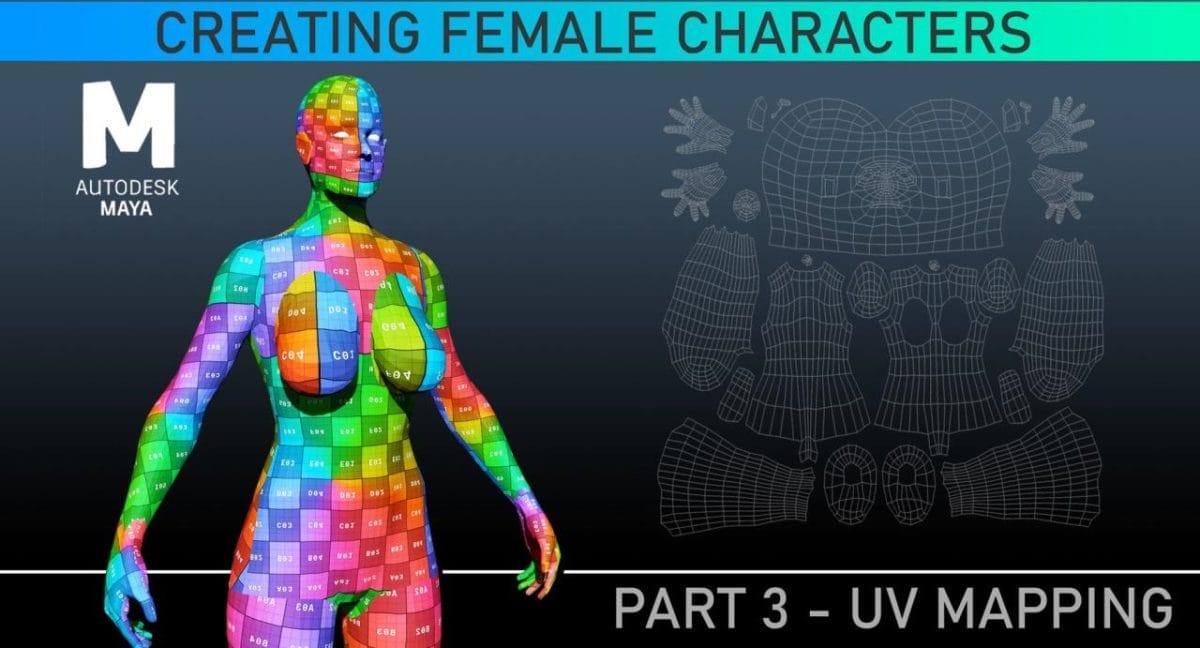
Creating high-quality UV maps is crucial for efficient texturing and maintaining the visual integrity of 3D models. Implementing best practices ensures consistency, organization, and effective utilization of UV space.
Planning and organization are paramount in UV mapping. Before commencing the unwrapping process, carefully analyze the model’s geometry and determine the most suitable UV mapping method. This forethought helps minimize distortions and optimize texture resolution.
Maintaining a Consistent Workflow
- Standardize UV Mapping Techniques: Establish a standardized set of UV mapping techniques and adhere to them consistently. This approach ensures uniformity and facilitates collaboration among team members.
- Create UV Templates: Develop UV templates for commonly used model types. These templates serve as starting points, reducing the time spent on UV unwrapping and promoting consistency.
- Utilize UV Mapping Software: Employ specialized UV mapping software to streamline the process and enhance efficiency. These tools offer features like automatic unwrapping, distortion minimization, and texture packing.
Optimizing UV Space Utilization
- Pack UV Shells Efficiently: Pack UV shells tightly together to minimize wasted space. This optimization ensures efficient texture usage and reduces the likelihood of texture bleeding.
- Avoid Overlapping UV Shells: Ensure that UV shells do not overlap, as this can result in distorted textures. Maintaining separation between shells guarantees clean and seamless texturing.
- Consider Texture Resolution: Take into account the texture resolution when packing UV shells. Higher resolution textures require larger UV space, while lower resolution textures can be packed more tightly.
Ensuring High-Quality UV Maps
- Minimize Distortion: Prioritize minimizing distortion in UV maps. Distortion can lead to blurry or pixelated textures, compromising the visual quality of the model.
- Preserve Detail: Pay attention to preserving detail in areas of the model that require high-resolution textures. Allocate sufficient UV space to these areas to ensure sharp and crisp textures.
- Test and Iterate: Continuously test and iterate on UV maps to identify and address any issues. This iterative process helps refine the UV layout and achieve optimal results.
Outcome Summary
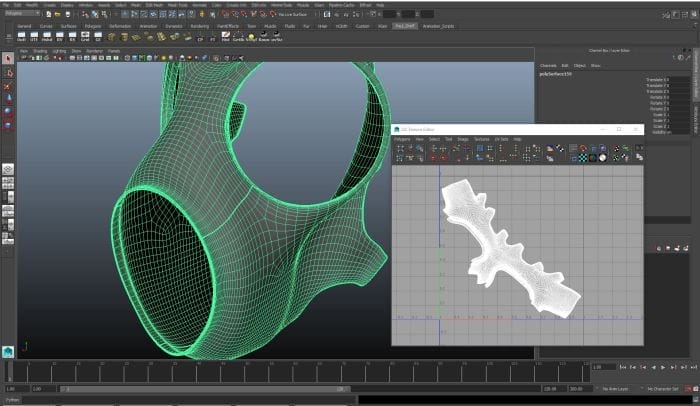
As you embark on your UV mapping journey, remember that practice is the key to mastery. With each project, you’ll refine your skills, gaining a deeper understanding of the nuances and complexities of this art form. Embrace experimentation, explore different techniques, and seek inspiration from fellow artists.
The world of UV mapping is a vast and ever-evolving landscape, offering endless opportunities for growth and creative expression. We hope this guide has provided you with the foundation you need to navigate this exciting realm and unlock the full potential of your 3D creations.
Welcome to the world of UV mapping, where artistry meets precision, and where your imagination takes form.
FAQ Corner
What industries utilize UV mapping?
UV mapping finds applications in a wide range of industries, including video games, film and animation, architecture, product design, and fashion.
What are the common challenges in UV mapping?
Common challenges include creating clean and efficient UV shells, minimizing distortion, and resolving overlapping UV islands.
How do I select the appropriate UV mapping method?
The choice of UV mapping method depends on the shape and complexity of the 3D model. Cylindrical mapping is suitable for cylindrical objects, planar mapping for flat surfaces, spherical mapping for spherical objects, and cube mapping for box-like objects.
What is the significance of packing and optimizing the UV layout?
Packing and optimizing the UV layout ensures efficient use of texture space, minimizing stretching and distortion of textures.
How do I troubleshoot common UV mapping issues?
Common issues include stretching, distortion, overlapping, and seams. These can be resolved by adjusting UV shells, optimizing the UV layout, and using appropriate texture resolutions.


